Image Hosting solution, Flickr/imgur alternative, make it easy for users to share their images. Using Cloudflare Pages and Telegraph.
Telegraph-Image
Free Image Hosting solution, Flickr/imgur alternative. Using Cloudflare Pages and the Telegram Bot API (Telegram Channel).
English|中文
[!IMPORTANT]
Since the original Telegraph API interface was closed by the official, you need to switch the upload channel to Telegram Channel. Please set
TG_Bot_TokenandTG_Chat_IDaccording to the deployment requirements in the documentation, otherwise the upload function will not work properly.
Table of Contents
- Quick Start: deploy a working image host in 3 steps
- How to Obtain Telegram Bot Token and Chat ID
- Configuration Reference: all environment variables and the KV binding
- Features
- Optional Features Guide: dashboard / upload protection / short links / image review / anti-hotlinking / R2 storage / site customization / whitelist mode / custom domain
- Upload API
- Limitations and Free Quotas
- How to Update if Already Deployed?
- FAQ
- Local Development and Testing
- Update Log
Quick Start
3 simple steps to have your own image hosting. The only thing you need in advance is a Cloudflare account (to deploy on your own server without relying on Cloudflare, refer to #46).
Fork this repository (Note: You must deploy using Git or the Wrangler CLI tool for it to work properly, Documentation)
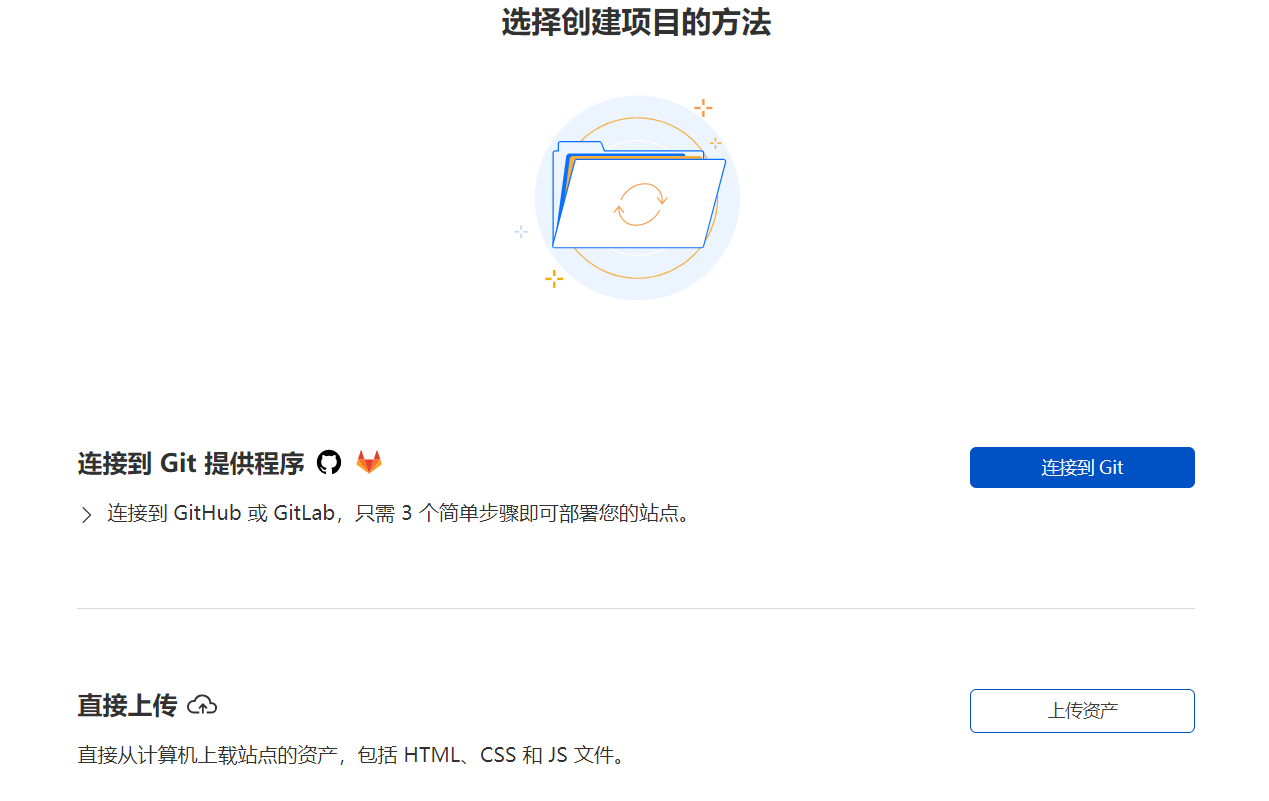
Open the Cloudflare Dashboard, enter the Pages management page, select Create Project, choose
Connect to Git provider, follow the prompts to enter the project name, select the repository you just forked, then clickDeploy site
- After deployment, go to the project's
Settings->Environment Variables, addTG_Bot_TokenandTG_Chat_ID(see the next section for how to obtain them), save, then go to theDeploymentspage and redeploy once
Done! Open your *.pages.dev domain and start uploading. For the dashboard, upload protection, short links, and more, see the Optional Features Guide.
How to Obtain Telegram Bot_Token and Chat_ID
If you don't have a Telegram account yet, please create one first. Then, follow these steps to get the BOT_TOKEN and CHAT_ID:
- Get the
Bot_Token- In Telegram, send the command
/newbotto @BotFather, and follow the prompts to input your bot's name and username. Once successfully created, you will receive aBOT_TOKEN, which is used to interact with the Telegram API.
- In Telegram, send the command
- Set the bot as a channel administrator
- Create a new channel (Channel), enter the channel and select channel settings. Add the bot you just created as a channel administrator, so it can send messages.
Get the
Chat_ID- Get your channel ID through @VersaToolsBot. Send a message to this bot and follow the instructions to receive your
CHAT_ID(the ID of your channel). - Or get your channel ID through @GetTheirIDBot. Send a message to this bot and follow the instructions to receive your
CHAT_ID(the ID of your channel).
- Get your channel ID through @VersaToolsBot. Send a message to this bot and follow the instructions to receive your
Configuration Reference
All configuration is done in your Cloudflare Pages project's Settings. Note: after changing environment variables or the KV binding, you need to redeploy for the changes to take effect.
Required environment variables:
| Environment Variable | Example Value | Description |
|---|---|---|
TG_Bot_Token |
123468:AAxxxGKrn5 |
Telegram Bot Token obtained from @BotFather. |
TG_Chat_ID |
-1234567 |
Channel ID, ensure the TG Bot is an administrator of the channel or group. |
Optional environment variables (enable features as needed, see the Optional Features Guide):
| Environment Variable | Example Value | Description |
|---|---|---|
BASIC_USER |
admin |
Login username for the dashboard (/admin). Leave unset for a dashboard without login. |
BASIC_PASS |
admin-password |
Login password for the dashboard. Must be set together with BASIC_USER. |
UPLOAD_BASIC_USER |
uploader |
Username for protecting the public upload endpoint. Leave unset to keep uploads public. |
UPLOAD_BASIC_PASS |
strong-password |
Password for protecting the public upload endpoint. Must be set together with UPLOAD_BASIC_USER. |
ENABLE_SHORT_URLS |
true |
When enabled (and a KV namespace is bound), uploads return a short link like /file/AbC123 instead of the long file name. Existing long links keep working. |
SHORT_URL_LENGTH |
6 |
Length of generated short ids (4-16, default 6). Only used when ENABLE_SHORT_URLS is on. |
MODERATION_PROVIDER |
cloudflare-ai |
Image review provider: cloudflare-ai (Workers AI, recommended), moderatecontent (legacy), or none. When unset, auto-detects: a ModerateContentApiKey selects moderatecontent, an AI binding selects cloudflare-ai. See Enable Image Review. |
MODERATION_AI_MODEL |
@cf/meta/llama-3.2-11b-vision-instruct |
Workers AI model used by the cloudflare-ai review provider. When unset, a built-in fallback chain of current vision models is tried in order, so a model being retired by Cloudflare degrades gracefully. |
CF_ACCOUNT_ID / CF_API_TOKEN |
abc123 / token |
Optional, together enable live model discovery: the review model chain is built from Cloudflare's current model catalog (cached in KV for 6h) instead of the built-in list, so retired models drop out and new vision models join automatically. The token only needs the "Workers AI: Read" permission. |
ModerateContentApiKey |
abc123 |
Legacy image review via moderatecontent.com. The service has stopped accepting new registrations — new deployments should use Workers AI instead. |
ALLOWED_REFERERS |
myblog.com,*.example.com |
Anti-hotlinking: comma-separated list of hostnames allowed to embed your files. Unset = no restriction. Empty referers (direct visits, API clients) and your own domain are always allowed. |
STORAGE_PROVIDER |
telegram |
Where uploaded files are stored: telegram (default) or r2 (requires the img_r2 binding). Files remain readable regardless of the current setting — each file remembers where it lives. |
SITE_NAME |
My Images |
Site name shown in the homepage header (served to the frontend via GET /api/config). |
SITE_TITLE |
My Images | Home |
Browser tab title of the homepage. |
SITE_BACKGROUND |
https://.../bg.jpg |
Background image URL for the homepage. |
HIDE_ADMIN_ENTRY |
true |
Hides the dashboard link on the homepage (the /admin page itself stays reachable). |
WhiteList_Mode |
true |
Whitelist mode: only whitelisted images can be loaded. |
disable_telemetry |
true |
Opt out of remote telemetry. |
Bindings (Settings -> Functions):
| Type | Variable Name | Description |
|---|---|---|
| KV namespace | img_url |
Bind a pre-created KV namespace to enable the image management dashboard; the short links feature also requires this binding |
| R2 bucket | img_r2 |
Bind a pre-created R2 bucket to enable STORAGE_PROVIDER=r2 |
| Workers AI | AI |
Bind Workers AI to enable the built-in image review provider |
Features
Unlimited image storage, you can upload an unlimited number of images
No need to purchase a server, hosted on Cloudflare's network. When usage does not exceed Cloudflare's free quota, it's completely free
No need to purchase a domain name, you can use the free second-level domain
*.pages.devprovided by Cloudflare Pages, and also supports binding custom domain namesPluggable image review, can be enabled as needed — built-in support for Cloudflare Workers AI (no external account) and legacy moderatecontent.com keys. When enabled, inappropriate images will be automatically blocked and no longer loaded
Supports backend image management, allowing you to preview uploaded images online, add to whitelist, blacklist, and other operations
Supports multiple file types (images, videos, audio, and more). Previewable files (images/video/audio/PDF) open directly in the browser instead of being force-downloaded
Optional Basic Auth protection for the upload endpoint and optional short links, both enabled on demand via environment variables
Pluggable storage: files live on Telegram by default, or in a Cloudflare R2 bucket with one environment variable — old links keep working either way
Batch upload with drag & drop and paste support, per-file progress, and one-click copy as URL / Markdown / BBCode / HTML; optional anti-hotlinking via a referer allowlist
Deployment self-check: when configuration is incomplete the homepage says which environment variable or binding is missing and where to set it, instead of failing on the first upload
Optional Features Guide
Image Management Dashboard
Disabled by default. To enable: in the Cloudflare Pages backend, click Settings -> Functions -> KV namespace bindings -> Edit bindings, enter img_url as the Variable name, select a pre-created KV namespace as the KV namespace, redeploy, then visit http(s)://your-domain/admin to open the dashboard
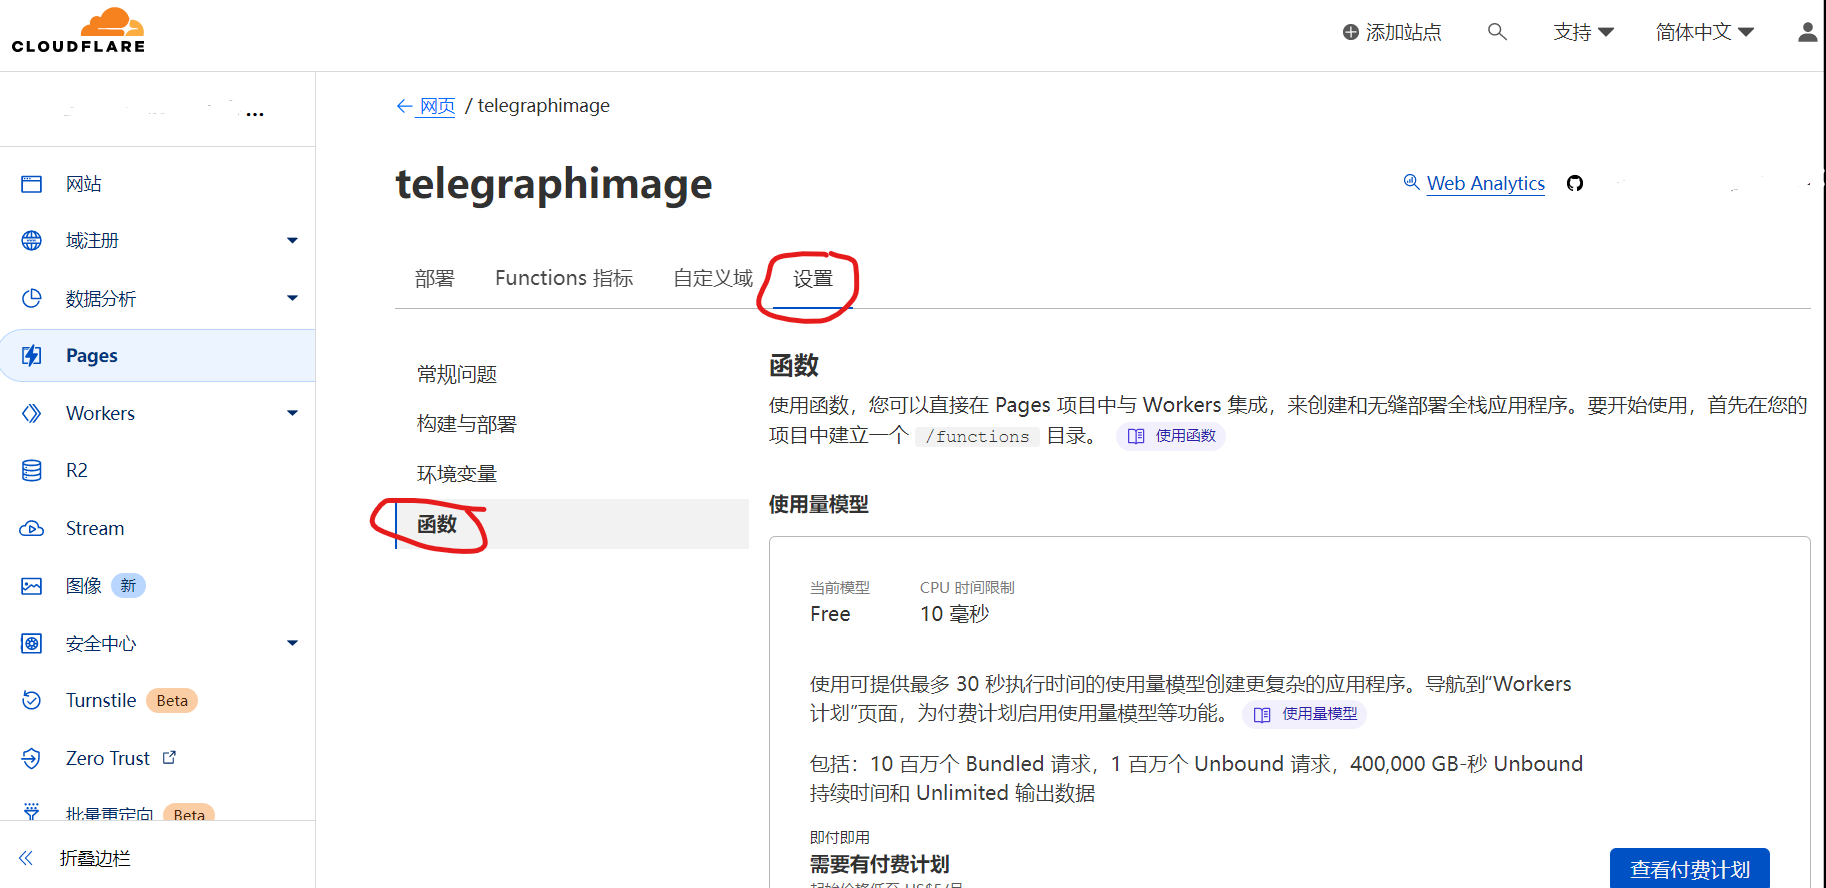
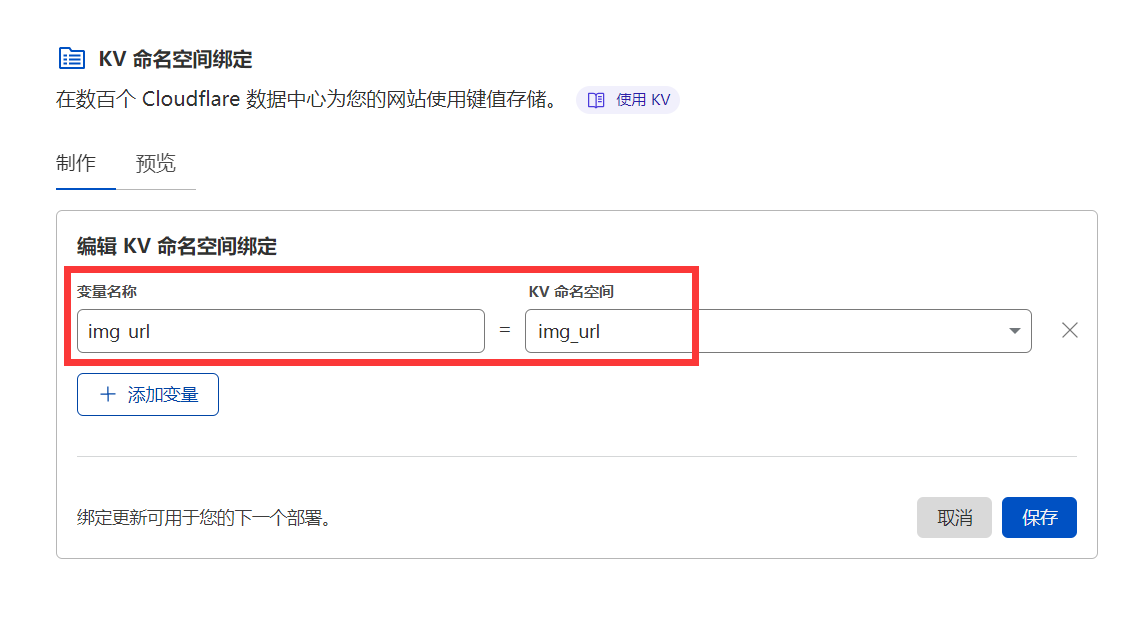
The dashboard supports: total image count, filename search, paginated loading, online preview, rename, blacklist/whitelist management, record deletion, and grid/waterfall views. See the Update Log for detailed descriptions and screenshots of each feature.
Note: the dashboard "delete" action only removes the record from the list; it does not delete the source file from Telegram. To prevent a file from loading, use the blacklist feature.
Dashboard Login
Disabled by default. To enable, add the following environment variables:
| Variable Name | Value |
|---|---|
BASIC_USER |
Dashboard login username |
BASIC_PASS |
Dashboard login password |
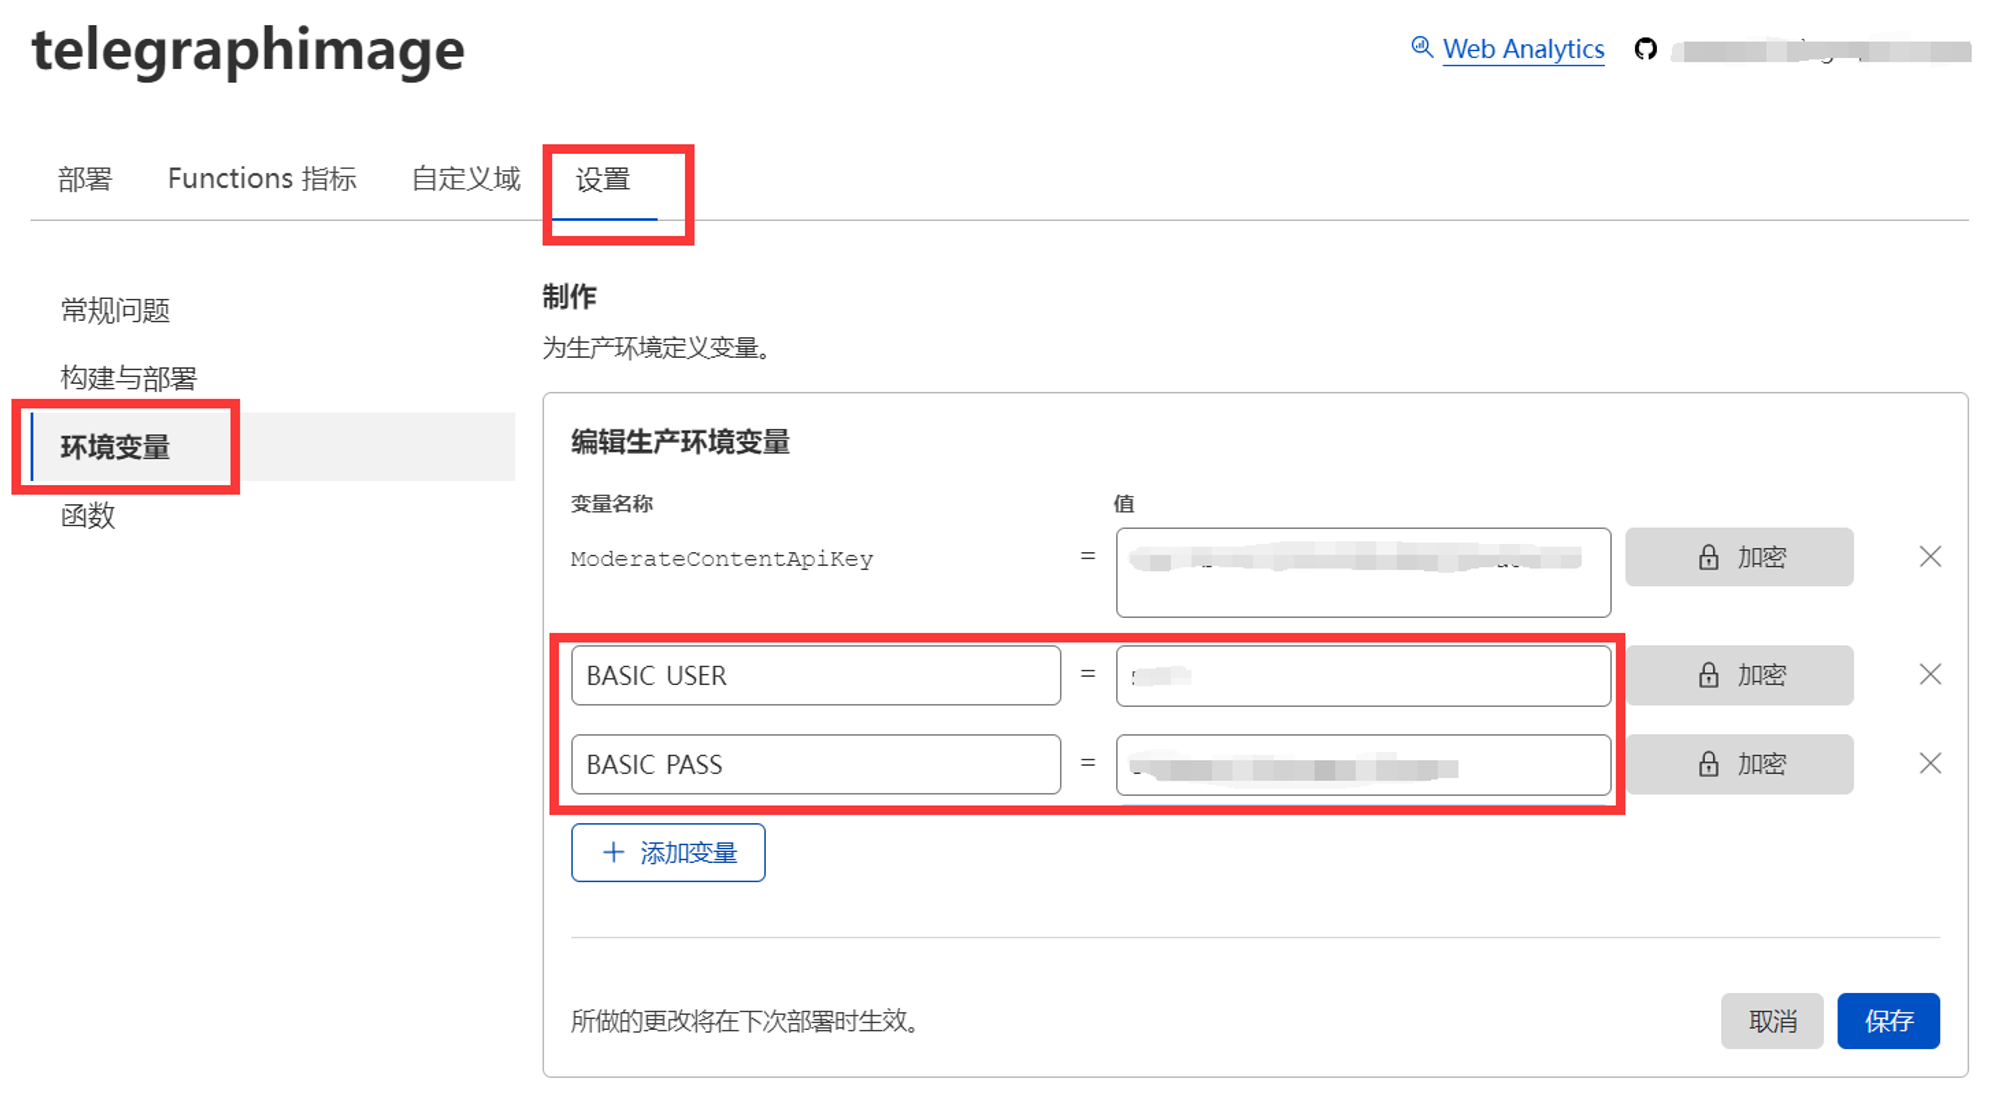
Of course, you can also choose not to set these two values, so that accessing the backend management page will not require verification and will skip the login step directly. This design allows you to use it in combination with Cloudflare Access to achieve email verification code login, Microsoft account login, Github account login, and other functions. It can be integrated with the existing login method on your domain without having to remember another set of backend credentials. For adding Cloudflare Access, please refer to the official documentation. Note that the protected path needs to include /admin and /api/manage/*
Upload Protection
Uploads are public by default. To protect only the public upload endpoint, set both UPLOAD_BASIC_USER and UPLOAD_BASIC_PASS; the web page and API uploads will then require Basic Auth (see Upload API for API usage). When these two variables are not set, uploads remain public for compatibility with existing deployments.
Short Links
Disabled by default. With a KV namespace bound and ENABLE_SHORT_URLS=true, uploads return short links like /file/AbC123 (length configurable via SHORT_URL_LENGTH, 4-16, default 6), and the dashboard copy buttons prefer the short link. Existing long links are unaffected and keep working.
Enable Image Review
Image review is pluggable. Two providers are built in, and each file is only reviewed once — the verdict is stored in KV (Label), so later loads are fast and consume no review quota. Review requires the img_url KV binding.
Recommended: Cloudflare Workers AI (no external account needed)
- Open your Pages project, go to
Settings->Functions->Workers AI bindings, add a binding with the variable nameAI - Redeploy. That's it — with an
AIbinding present, review is enabled automatically (or setMODERATION_PROVIDER=cloudflare-aiexplicitly)
The default model is Llama 3.2 Vision (@cf/meta/llama-3.2-11b-vision-instruct); override it with MODERATION_AI_MODEL. When no override is set, a built-in fallback chain is tried in order — if Cloudflare ever retires the primary model, review automatically falls through to the next one instead of breaking, and a review failure never blocks an image (fail-open). Workers AI has a free daily allocation (10,000 neurons/day) which is typically plenty, since each image is only reviewed on its first load. Files flagged as adult content are blocked and redirect to the block page.
Optional: live model discovery. The AI binding can only run models, not list them, so keeping the chain current normally means updating this repo. If you'd rather not depend on that, set CF_ACCOUNT_ID and CF_API_TOKEN (a token with just the "Workers AI: Read" permission): the review chain is then built from Cloudflare's live model catalog — models past their deprecation date are dropped and currently-served vision models are appended automatically. The catalog is cached in KV for 6 hours, and if the catalog API is ever unreachable the built-in chain is used as before.
Legacy: moderatecontent.com
[!WARNING] moderatecontent.com has stopped accepting new registrations. This provider is kept only for deployments that already have a working API key. Note that it can only review files uploaded through the old Telegraph channel (it fetches the image from
telegra.ph); files uploaded via the Telegram Bot API cannot be reviewed by it — use the Workers AI provider instead.
If you have an existing key, set ModerateContentApiKey as before; it keeps working unchanged. To turn review off entirely regardless of other settings, set MODERATION_PROVIDER=none.
Anti-Hotlinking
Disabled by default. Set ALLOWED_REFERERS to a comma-separated list of hostnames allowed to embed your files, e.g. myblog.com,*.example.com (the *. prefix matches the domain and all of its subdomains). Requests from other sites receive 403. Requests with no referer (direct browser visits, curl, native apps) and requests from your own domain are always allowed, so enabling this never breaks direct links.
R2 Storage
By default files are stored on Telegram. To store new uploads in Cloudflare R2 instead (no 20MB serving limit, no Telegram rate limits, but subject to R2 free quota):
- Create an R2 bucket, then in
Settings->Functions->R2 bucket bindingsadd it with the variable nameimg_r2 - Set the environment variable
STORAGE_PROVIDER=r2and redeploy
Switching is safe at any time: R2 file ids are self-describing (/file/r2-...), so previously uploaded Telegram files keep loading even after you switch, and vice versa.
Site Customization
The homepage reads its configuration from GET /api/config at load time, so you can rebrand without editing any HTML: set SITE_NAME (header), SITE_TITLE (browser tab), SITE_BACKGROUND (background image URL), and HIDE_ADMIN_ENTRY=true to hide the dashboard link. The same endpoint is available to any custom frontend you build against this backend.
Whitelist Mode
With the image management feature enabled, set the environment variable WhiteList_Mode to true and only images added to the whitelist will be loaded. Uploaded images need to be approved before they can be displayed, which prevents inappropriate images from loading to the greatest extent
Bind Custom Domain
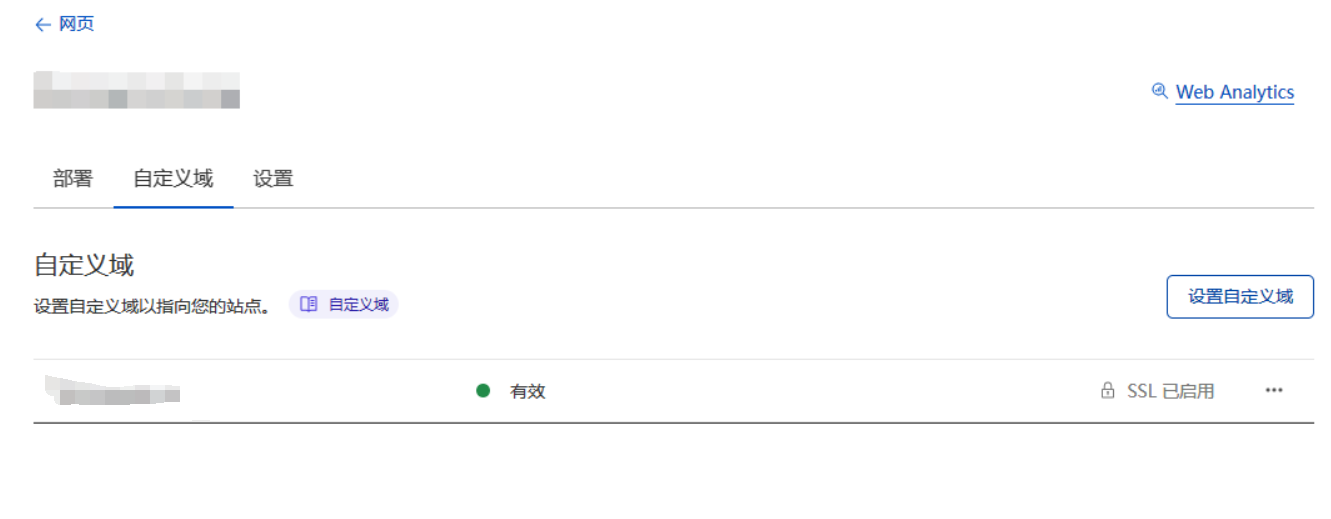
In the custom domain section of Pages, bind a domain name that exists in Cloudflare. For domain names hosted in Cloudflare, DNS records will be automatically modified
Upload API
The upload endpoint is POST /upload using multipart/form-data, with the file in a field named file:
curl -F "file=@/path/to/image.png" https://your.domain/upload
The response is a JSON array where src is the file's access path (with short links enabled, this returns the short link directly):
[{ "src": "/file/abc123def456.png" }]
If UPLOAD_BASIC_USER and UPLOAD_BASIC_PASS are configured, include Basic Auth with the request:
curl -u uploader:strong-password -F "file=@/path/to/image.png" https://your.domain/upload
The endpoint works with upload tools that support custom web image hosts, such as PicGo.
[!NOTE] When storing to Telegram (the default), uploads are subject to Telegram's Bot API rate limit of roughly 20 messages per minute per channel. Batch uploads that exceed this rate will start failing with Telegram errors — space out large batches, or switch to R2 storage, which has no such limit.
Limitations and Free Quotas
Files are uploaded via the Telegram Bot API and stored on Telegram's servers. Uploads are limited by the Bot API (about 50MB per file), but the Bot API file download endpoint (getFile) only supports files up to 20MB, so files larger than 20MB cannot be served back after upload — treat 20MB as the practical per-file limit. Telegram also rate-limits bots to about 20 messages per minute per channel, which caps sustained upload throughput. Both limits disappear when using R2 storage instead
Due to the use of Cloudflare's network, image loading speed may not be guaranteed in some regions
The free version of Cloudflare Function is limited to 100,000 requests per day (i.e., the total number of uploads or image loads cannot exceed 100,000). If exceeded, you may need to purchase the paid plan of Cloudflare Function
With the image management feature enabled, Cloudflare KV free quotas also apply:
- Cloudflare KV only has a free write quota of 1000 times per day. Each new image loaded will consume this write quota. If this quota is exceeded, the image management backend will not be able to record newly loaded images
- Maximum of 100,000 free read operations per day. Each image load will consume this quota (when there is no cache. If your domain has cache enabled on Cloudflare, this quota will only be consumed when the cache misses). If exceeded, blacklist and whitelist features may fail
- Maximum of 1,000 free delete operations per day. Each image record will consume this quota. If exceeded, you will not be able to delete image records
- Maximum of 1,000 free list operations per day. Each time you open or refresh the backend /admin, it will consume this quota. If exceeded, backend image management will be affected
In most cases, the free quota is basically sufficient and can be slightly exceeded. It doesn't stop immediately when exceeded. Each quota is calculated separately. When a certain operation exceeds the free quota, only that operation will be suspended and will not affect other functions. That is, even if my free write quota is used up, my read and write functions are not affected, images can load normally, I just can't see new images in the image management backend.
If your free quota is not enough, you can purchase the paid version of Cloudflare Workers from Cloudflare yourself, starting at $5 per month, pay-as-you-go, without the above quota limitations
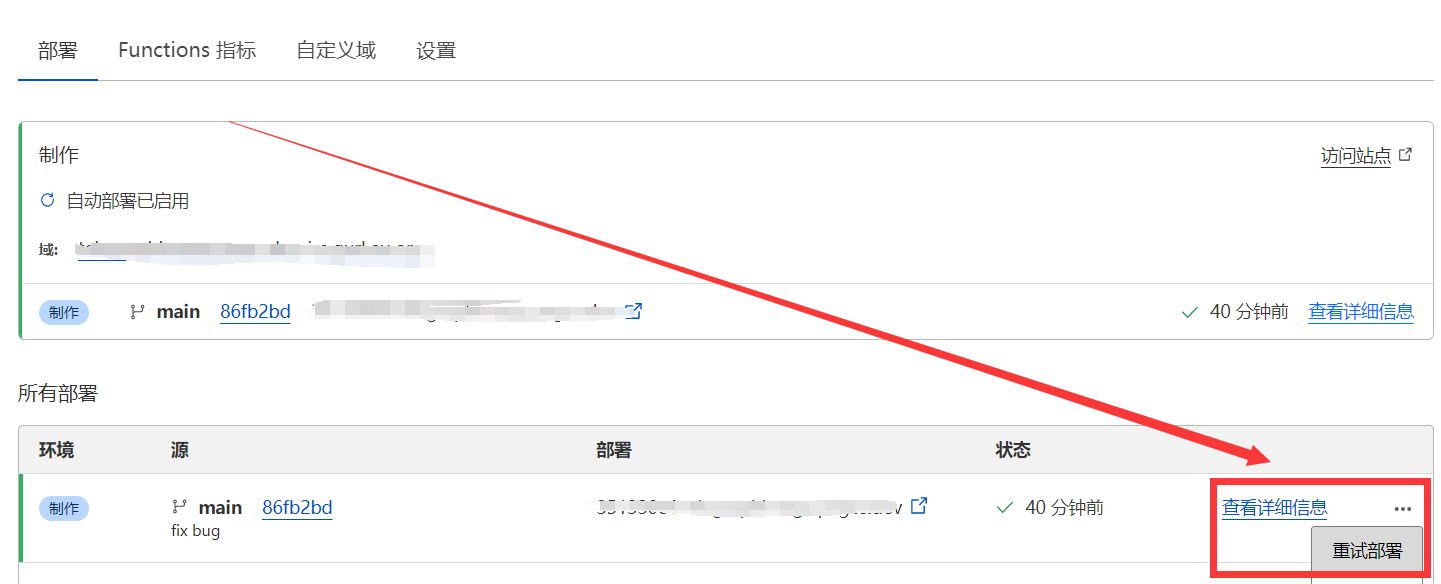
In addition, changes made to environment variables will take effect on the next deployment. If you changed Environment Variables to enable or disable a certain function, remember to redeploy.
How to Update if Already Deployed?
Updating is actually very simple. Just refer to the update log, first go to the Cloudflare Pages backend, set the required environment variables in advance and bind the KV namespace, then go to your previously forked repository on Github and select Sync fork->Update branch. After a while, Cloudflare Pages will detect that your repository has been updated and will automatically deploy the latest code
You can also enable automatic syncing: after forking, go to your repository's Actions page, enable Workflows and the Upstream Sync Action to sync with upstream hourly (see the July 2024 section of the Update Log for illustrated instructions).
FAQ
Deployment fails with "Missing entry-point to Worker script or to assets directory"
This happens when the project is deployed as a Worker instead of a Pages project (e.g. wrangler deploy, or picking "Workers" when connecting the repository). This repository has no Worker entry point — it is a Pages project using file-based Functions. Deploy it via Workers & Pages -> Create -> Pages -> Connect to Git, leave the build command empty, and set the build output directory to /. From the CLI, the equivalent is wrangler pages deploy ., not wrangler deploy.
Images stopped loading / uploads fail after a while
Check the Telegram rate limit (about 20 messages per minute per channel, see Upload API) and the Cloudflare free quotas. Also make sure TG_Bot_Token and TG_Chat_ID are set and the bot is still an administrator of the channel.
Does changing an environment variable take effect immediately?
No — go to Deployments and redeploy once after any change to environment variables or bindings.
Local Development and Testing
npm install
npm start      # start a local dev server (wrangler pages dev on port 8080; dashboard credentials default to admin/123)
npm test       # run the unit tests (mocha) — this is what CI runs
End-to-end tests drive a real browser via Playwright. They are an optional suite, so Playwright is deliberately not a project dependency (otherwise every contributor's npm install would pull a browser download). Install it once before the first run:
npm install --no-save playwright && npx playwright install chromium
Then start a dev server in one terminal and run the suite in another. Prefer start:r2, which points storage at a locally simulated R2 bucket so the whole upload path works without any Telegram credentials:
npm run start:r2   # terminal 1
npm run test:e2e   # terminal 2
The end-to-end suite covers batch upload, drag-and-drop, file retrieval and Content-Type, all four output formats, the setup self-check notice, and the dashboard; screenshots land in test/e2e/output/. Env vars: E2E_BASE_URL (default http://localhost:8080) and E2E_CHROMIUM (path to a Chromium binary, for environments where Playwright cannot download its own).
The dashboard (/admin) loads Vue and Element UI from cdn.jsdelivr.net, so it renders blank where that CDN is unreachable — the end-to-end suite detects this and skips the dashboard check instead of failing.
Thanks
Ideas and code provided by Hostloc @feixiang and @乌拉擦
Update Log
July 19, 2026 - Pluggable Storage & Review, New Homepage, Anti-Hotlinking
- Image review is now pluggable, with a new built-in provider based on Cloudflare Workers AI (bind
AI, no external account needed) — moderatecontent.com has stopped accepting registrations and its provider is kept for legacy keys only; review verdicts are now cached per file, so each file is reviewed at most once (#203/#196/#174/#166/#85/#49) - Storage is now pluggable:
STORAGE_PROVIDER=r2with animg_r2R2 bucket binding stores new uploads in Cloudflare R2, lifting the 20MB serving limit and Telegram rate limits; Telegram remains the default and old files keep loading either way (#181/#118) - Rebuilt the homepage as a dependency-free single file with batch upload, drag & drop, paste-to-upload, per-file progress, and URL/Markdown/BBCode/HTML link copying; the old Nuxt page remains at
/index-nuxt.html(#2/#5/#51/#92/#123/#156/#194) - Site customization via environment variables:
SITE_NAME,SITE_TITLE,SITE_BACKGROUND,HIDE_ADMIN_ENTRY, served to any frontend through the newGET /api/configendpoint (#55/#84/#107/#138/#195) - Anti-hotlinking via the
ALLOWED_REFERERSreferer allowlist, off by default and fully backward compatible (#78/#121) - Documented the Telegram ~20 messages/minute/channel rate limit (#245) and added a FAQ for the "Missing entry-point" deployment error (#267)
July 19, 2026 - Upload Protection, Short Links, and Preview Update
- Added optional Basic Auth protection for the upload endpoint via
UPLOAD_BASIC_USERandUPLOAD_BASIC_PASS, thanks to @ytagent and @lelouch0823 (#278/#279) - Added optional short links: enable with
ENABLE_SHORT_URLSand configure the length withSHORT_URL_LENGTH; uploads then return links like/file/AbC123and the dashboard copy buttons prefer the short link, thanks to @wyksean448 (#226/#305) - Previewable files (images, video, audio, PDF) now open directly in the browser instead of being force-downloaded (#279)
- Fixed incorrect Content-Type on files stored via the Bot API, which prevented images from rendering on GitHub and other strict clients, thanks to @gynamics (#233/#305)
- Fixed the broken rename feature in the dashboard, and refactored core functions with unit test coverage, thanks to @ytagent (#277/#304)
- The dashboard "delete" action is now explicitly record-only and does not remove the source file from Telegram (#279)
August 15, 2025 - Dashboard Loading Performance Update
- The dashboard file list now loads in pages (KV cursor pagination + load more) instead of fetching all records at once (#253)
- Dashboard search now filters by filename prefix on the server (#254)
July 6, 2024 - Backend Management Page Update
Support for two new management page views (Grid view and Waterfall view)
- Grid view, thanks to @DJChanahCJD for the submitted code
Supports batch delete/copy links
Supports sorting in reverse chronological order
Supports pagination
- Waterfall view, thanks to @panther125 for the submitted code
- Grid view, thanks to @DJChanahCJD for the submitted code
Supports batch delete/copy links
Supports sorting in reverse chronological order
Supports pagination
Added automatic update support
Now forked projects can automatically sync with the upstream repository to automatically install the latest project features, thanks to @bian2022
Steps to enable automatic updates: After you fork the project, due to Github's limitations, you need to manually go to the Actions page of your forked project to enable Workflows, and enable Upstream Sync Action. Once enabled, automatic updates will occur hourly:
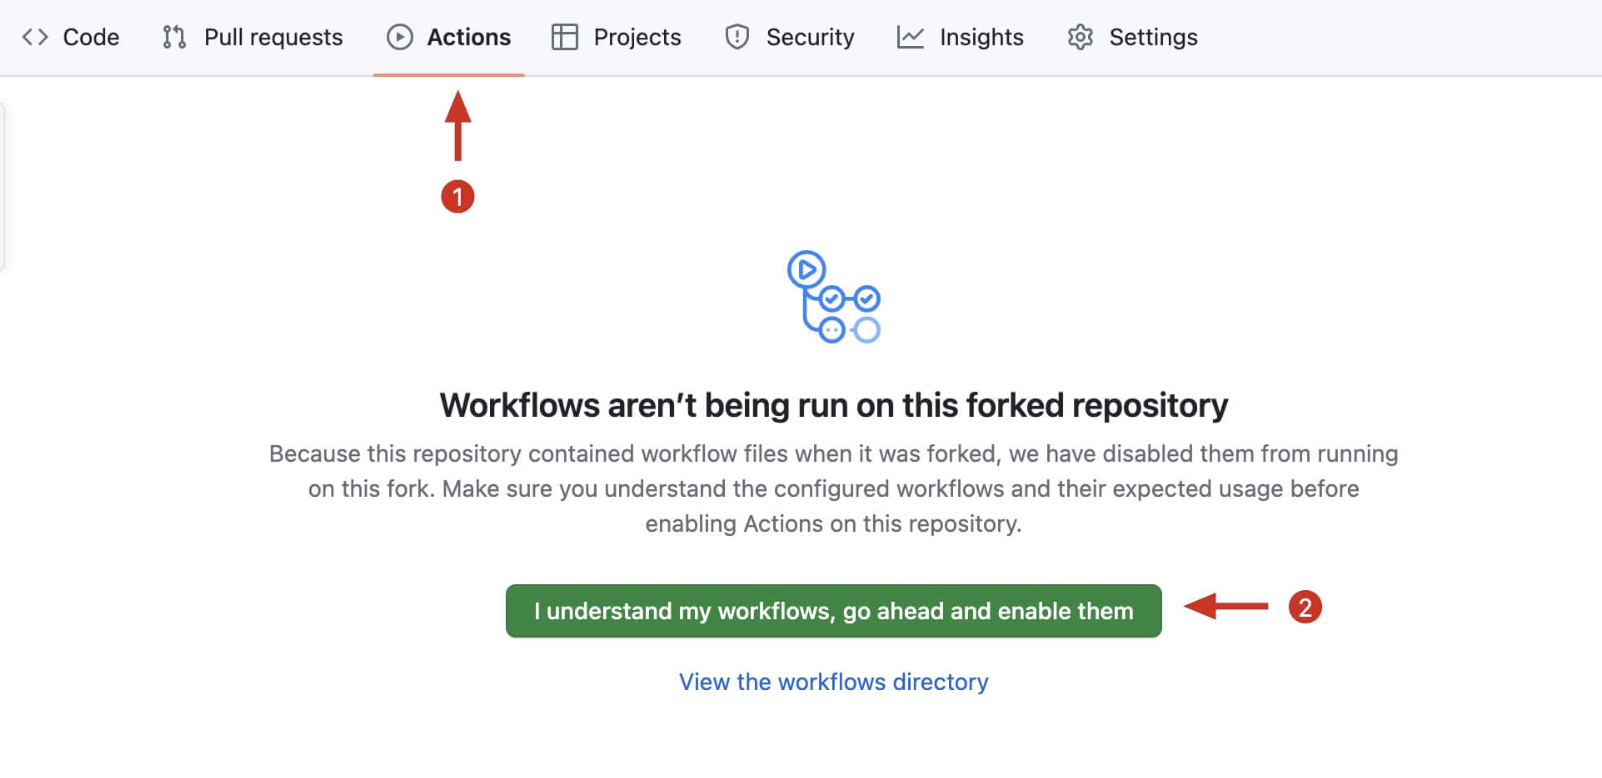
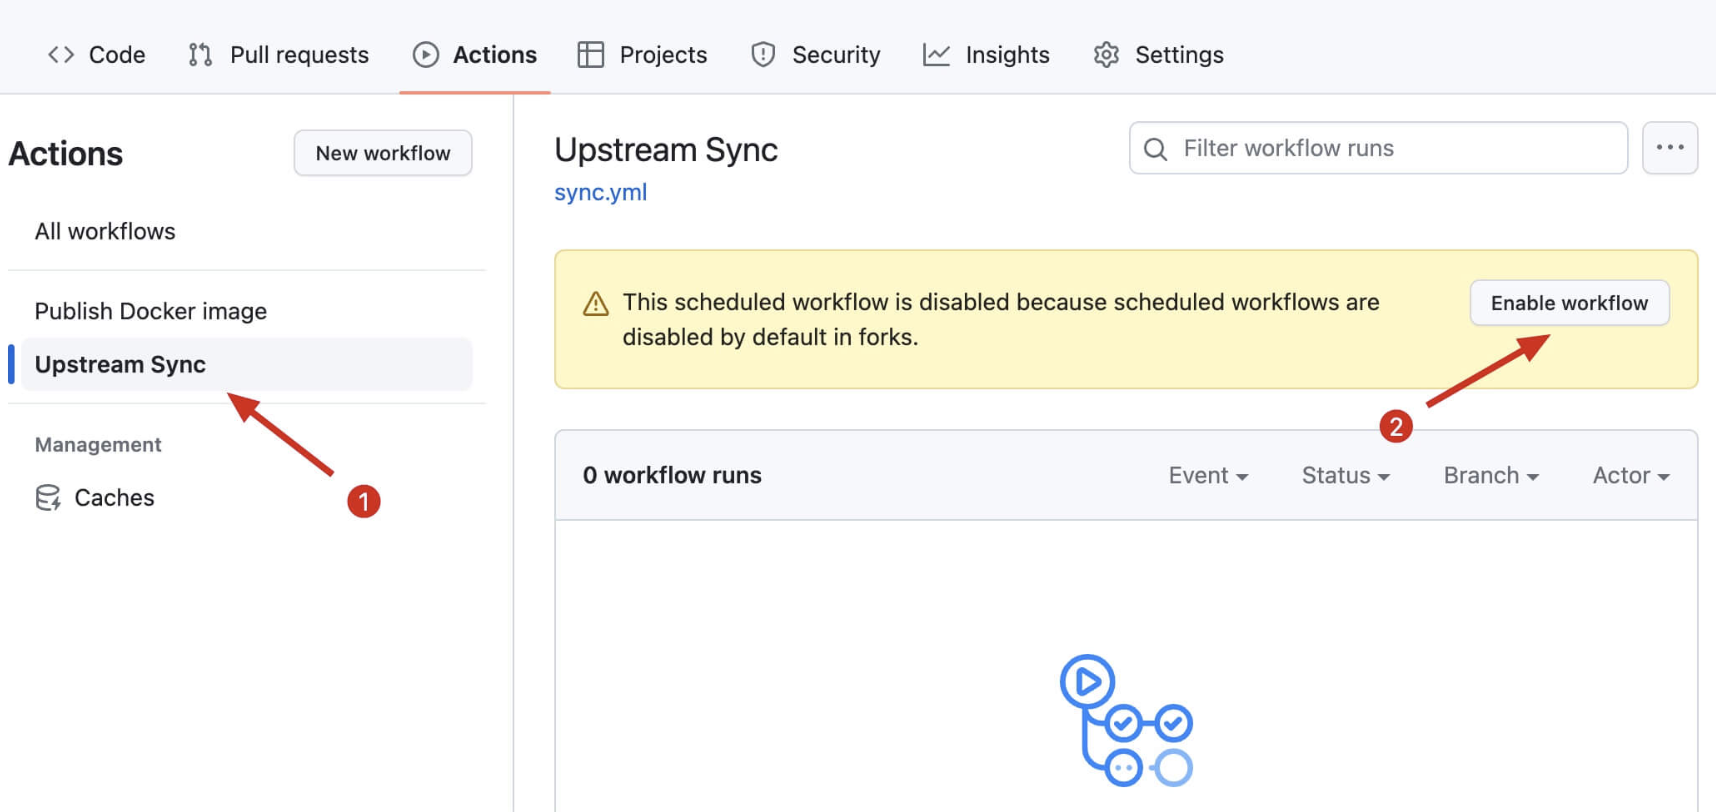
If you encounter Upstream Sync execution errors, please manually Sync Fork once!Manually update code
If you want to manually update immediately, you can check Github's documentation to learn how to sync your forked project with upstream code.
You can star/watch this project or follow the author to receive notifications of new feature updates.
Added remote telemetry
You can opt out of telemetry by adding the
disable_telemetryenvironment variable
January 18, 2023 - Image Management Feature Update
- Support for image management feature, disabled by default. To enable, after deployment, go to the backend and click
Settings->Functions->KV Namespace Bindings->Edit Bindings->Variable Nameenter:img_urlKV Namespaceselect the KV storage space you created in advance. After enabling, visit http(s)://your-domain/admin to open the backend management pageVariable Name KV Namespace img_url Select the KV storage space created in advance
- The backend management page has a new login verification feature, also disabled by default. To enable, after deployment, go to the backend and click
Settings->Environment Variables->Define variables for production->Edit variablesand add the variables shown in the table below to enable login verificationVariable Name Value BASIC_USERBackend management page login username BASIC_PASSBackend management page login password
Of course, you can also choose not to set these two values, so that accessing the backend management page will not require verification and will skip the login step directly. This design allows you to use it in combination with Cloudflare Access to achieve email verification code login, Microsoft account login, Github account login, and other functions. It can be integrated with the existing login method on your domain without having to remember another set of backend credentials. For adding Cloudflare Access, please refer to the official documentation. Note that the protected path needs to include /admin and /api/manage/*
You can also protect the public upload endpoint separately by setting both UPLOAD_BASIC_USER and UPLOAD_BASIC_PASS. When these two variables are not set, uploads remain public for compatibility with existing deployments.
- Added image total count statistics When the image management feature is enabled, you can view the number of images in the record at the top of the backend
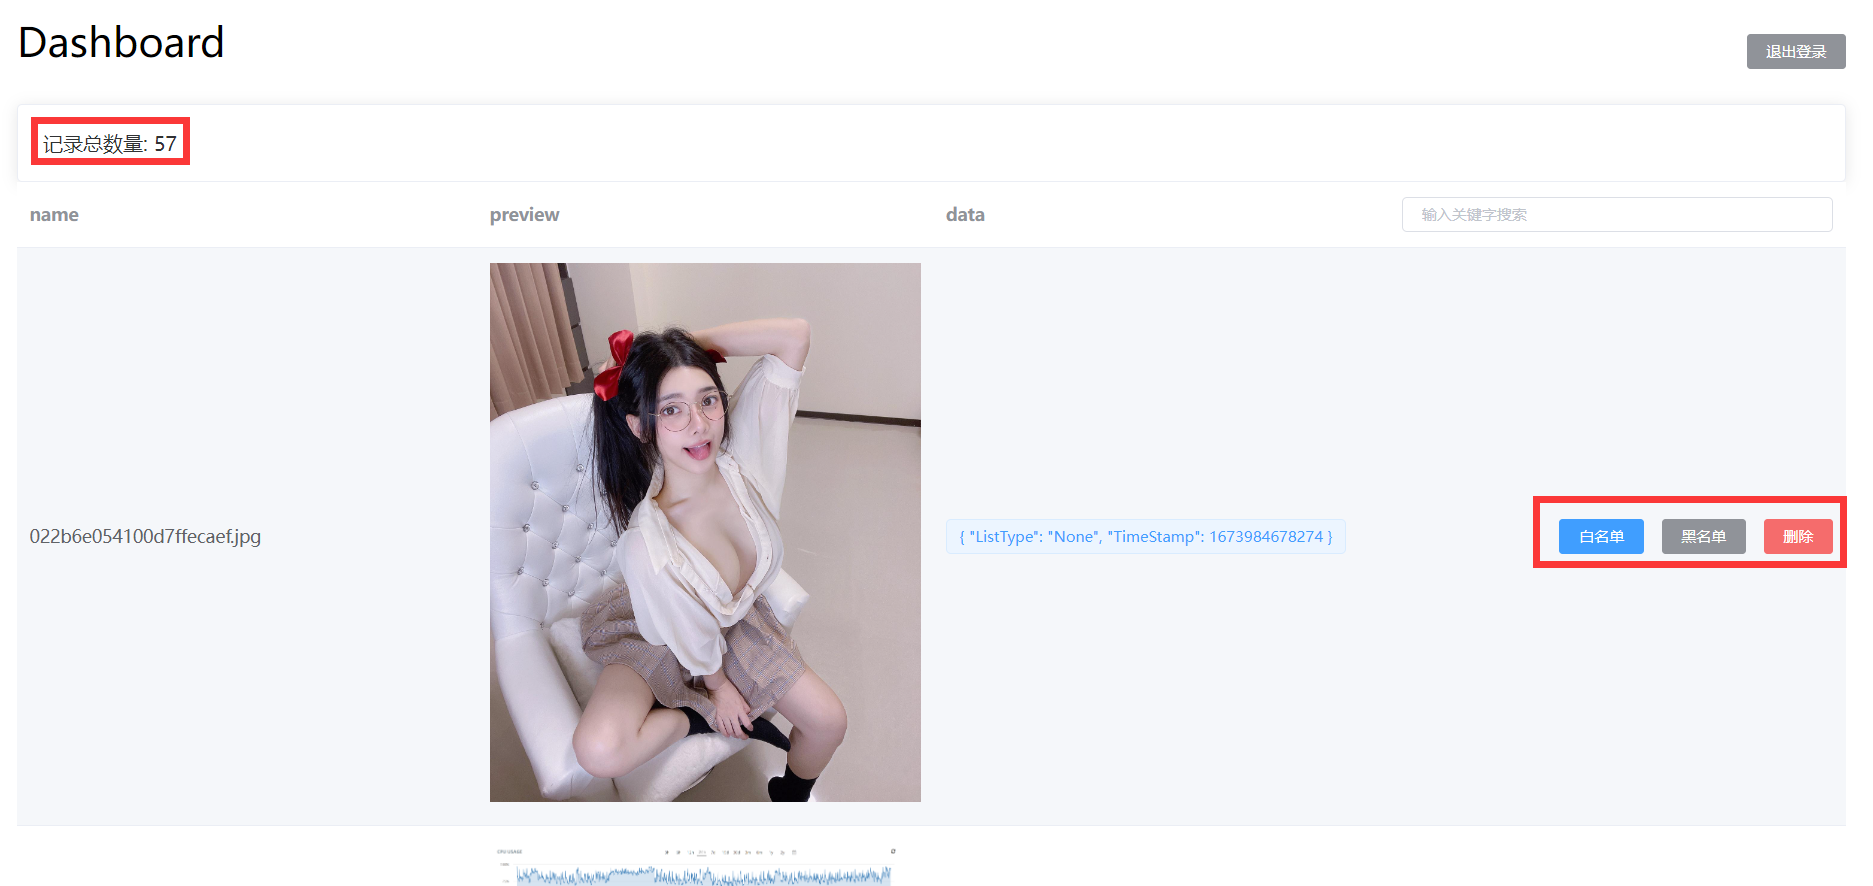
- Added image filename search When the image management feature is enabled, you can use the image filename in the backend search box to quickly search and locate the images you need to manage

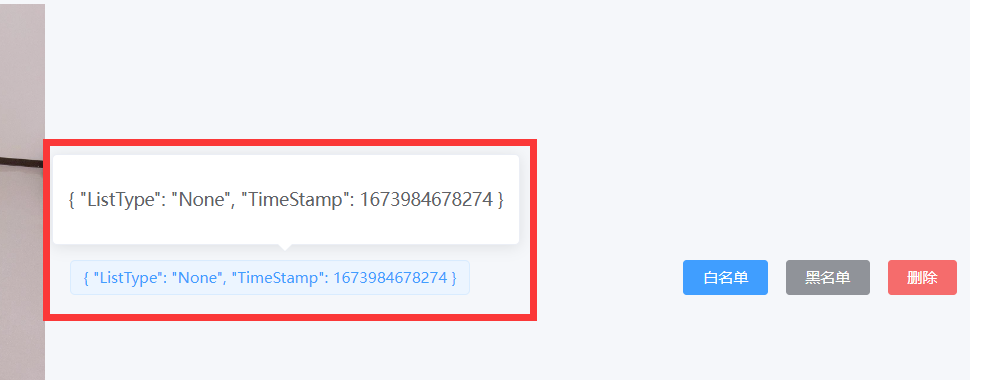
- Added image status display When the image management feature is enabled, you can view the current status of the image in the backend { "ListType": "None", "TimeStamp": 1673984678274 } ListType indicates whether the image is currently in the blacklist or whitelist. None means it's neither in the blacklist nor the whitelist, White means it's in the whitelist, Block means it's in the blacklist. TimeStamp is the timestamp when the image was first loaded. If image review API is enabled, the image review result will also be displayed here, identified by Label
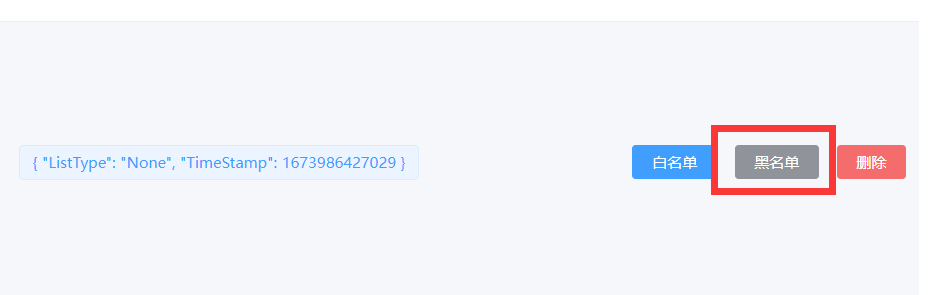
- Added blacklist feature When the image management feature is enabled, you can manually add images to the blacklist in the backend. Images on the blacklist will not load properly
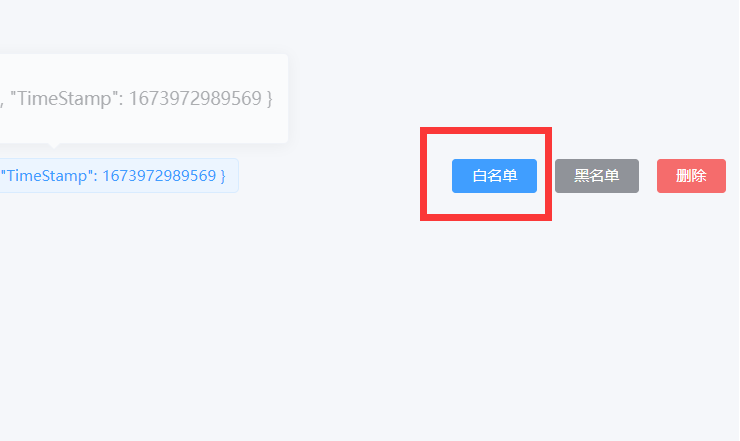
- Added whitelist feature When the image management feature is enabled, you can manually add images to the whitelist in the backend. Images on the whitelist will always load properly, bypassing the image review API results
Added record deletion feature When the image management feature is enabled, you can manually delete image records in the backend. This only removes the item from the backend list; it does not delete the original file from Telegraph or Telegram. If the file is uploaded and loaded again later, a record may be created again. To prevent the file from loading, use the blacklist feature mentioned in point 6 above.
Added program running mode: Whitelist mode When the image management feature is enabled, in addition to the default mode, this update also adds a new running mode. In this mode, only images added to the whitelist will be loaded. Uploaded images need to be approved before they can be displayed, which prevents inappropriate images from loading to the greatest extent. To enable, please set the environment variable: WhiteList_Mode=="true"
Added backend image preview feature When the image management feature is enabled, you can preview images loaded through your domain in the backend. Click on images to zoom in, zoom out, rotate, and perform other operations

Sponsorship
This project is tested with BrowserStack.
This project is support by Cloudflare.